
This guide teaches you how to draw cat food with simple, beginner-friendly steps. Whether you’re sketching kibble, wet food, or treats, you’ll master textures, shapes, and shading by 2026.
Key Takeaways
- Start with basic shapes: Use circles, ovals, and rectangles to outline different types of cat food before adding details.
- Focus on texture: Dry kibble needs crisp edges and shadows, while wet food requires smooth, glossy highlights.
- Use reference images: Real cat food photos help you capture accurate colors, sizes, and arrangements.
- Layer your shading: Build depth with light to dark pencil strokes or digital brushes for a realistic look.
- Experiment with styles: Try cartoon, realistic, or abstract versions to match your artistic vision.
- Include context: Drawing a bowl, spoon, or cat nearby adds storytelling and makes your artwork more engaging.
- Practice regularly: The more you draw cat food, the better you’ll understand its unique forms and textures.
Introduction: Why Learn How to Draw Cat Food?
Have you ever looked at a bowl of cat food and thought, “I could draw that”? Whether you’re an artist, a pet lover, or just looking for a fun new sketching challenge, learning how to draw cat food is both rewarding and surprisingly creative. In 2026, digital art tools and AI-assisted design have made it easier than ever to bring everyday objects to life on paper or screen.
Cat food comes in many forms—crunchy kibble, smooth pâté, chunky gravy-style, and even freeze-dried treats. Each type has its own texture, color, and shape, making it a fantastic subject for practicing observation, shading, and detail work. Plus, drawing pet-related items is a great way to connect with fellow animal enthusiasts online.
This guide will walk you through everything you need to know, from choosing your tools to mastering advanced techniques. By the end, you’ll be able to draw realistic or stylized cat food with confidence. Whether you’re sketching for a comic, designing pet product packaging, or just doodling for fun, these steps will help you create vibrant, lifelike artwork.
What You’ll Need to Get Started
Before diving into the drawing process, gather your materials. You don’t need expensive gear—just the basics to begin.
Traditional Tools
- Pencils: A range from HB (medium) to 6B (soft) for shading and detailing.
- Eraser: A kneaded eraser works best for lifting graphite without damaging paper.
- Paper: Smooth or medium-textured sketch paper (90–110 gsm) holds up well under layering.
- Blending tools: Tortillons or cotton swabs help smooth shadows.
- Ruler (optional): Useful for drawing straight lines, like the edge of a bowl.
Digital Tools (2026 Edition)
- Tablet and stylus: Devices like the iPad Pro with Apple Pencil or Wacom tablets offer precision.
- Art software: Popular apps include Procreate, Adobe Fresco, and Clip Studio Paint—many now include AI-assisted shading and texture brushes.
- Reference images: Use your phone or tablet to take close-up photos of real cat food for accuracy.
Optional Add-ons
- Color pencils or markers: For adding vibrant hues to kibble or treats.
- Watercolor paints: Great for soft, blended backgrounds or wet food textures.
- Lightbox or tracing paper: Helps refine sketches before finalizing.
Step 1: Choose Your Cat Food Type
Not all cat food is the same—and your drawing approach will vary depending on what you’re depicting. Here are the most common types and how to identify them:
Dry Kibble
This is the most recognizable form: small, crunchy pellets often shaped like circles, ovals, or stars. Brands like Royal Canin or Purina use uniform shapes, while others have fun designs.
Wet Food (Pâté or Chunks in Gravy)
Smooth and moist, pâté has a soft, spreadable texture. Chunks in gravy include larger pieces suspended in a shiny liquid.
Freeze-Dried or Dehydrated Treats
These are lightweight, porous, and often irregular in shape. They look like tiny, crunchy nuggets with a matte finish.
Raw or Homemade Mixes
Includes bits of meat, vegetables, or broth. These are more organic and varied in texture.
Pro Tip: Start with dry kibble—it’s the easiest to draw because of its simple, repetitive shapes. Once you master that, move on to wet food, which requires more attention to shine and fluidity.
Step 2: Sketch the Basic Shapes
Now that you’ve chosen your cat food type, it’s time to lay the foundation.
For Dry Kibble
- Draw a cluster of small circles or ovals. Vary the sizes slightly to make it look natural.
- Overlap some shapes to show depth—some kibble pieces will be in front of others.
- Add subtle lines to suggest texture, like tiny ridges or dents on the surface.
For Wet Food (Pâté)
- Start with a rounded mound in the center of your bowl.
- Use soft, flowing lines to show how the food spreads slightly at the edges.
- Add small ripples or folds to mimic the way wet food settles.
For Chunks in Gravy
- Draw irregular oval or rectangular shapes for the meat chunks.
- Place them randomly in a shallow pool—this represents the gravy.
- Leave gaps between chunks to show the liquid underneath.
For Treats
- Sketch small, jagged shapes with uneven edges.
- Add tiny holes or pores to show the freeze-dried texture.
- Scatter them loosely, as if they’ve been poured from a bag.
Remember: Keep your initial lines light. You’ll refine them in the next steps.
Step 3: Add Texture and Detail
This is where your drawing comes alive. Texture makes cat food look real—whether it’s crunchy, slimy, or chewy.
Drawing Dry Kibble Texture
- Use short, quick pencil strokes to create a rough surface.
- Add tiny shadows inside crevices to show depth.
- Vary pressure: press harder on the bottom edges (where light doesn’t hit) and lighter on top.
- For star-shaped kibble, draw five small points and shade between them.
Drawing Wet Food Texture
- Use smooth, blended shading for pâté. Avoid harsh lines.
- Add a soft highlight in the center—this shows moisture and shine.
- For gravy, draw wavy lines to suggest movement and liquidity.
- Use a blending stump to soften edges and create a glossy effect.
Drawing Treat Texture
- Make the surface look porous with tiny dots or dashes.
- Shade lightly—treats are usually light in color and don’t absorb much light.
- Add a slight shadow underneath each piece to show they’re sitting on a surface.
Pro Tip: Look at real cat food under a lamp. Notice how light reflects off wet surfaces versus dry ones. This will help you replicate the effect accurately.
Step 4: Shade for Depth and Realism
Shading turns a flat sketch into a 3D masterpiece. Here’s how to do it right.
Understanding Light Sources
Decide where your light is coming from—top left, top right, or directly above. This determines where shadows fall.
- Highlights: The brightest spots where light hits directly. Leave these areas light or white.
- Midtones: The base color of the food. Use medium pressure for these areas.
- Shadows: Darker areas where light doesn’t reach. Use heavier pencil strokes or digital brushes.
- Cast shadows: Shadows the food casts on the bowl or table. These are usually soft and blurred.
Shading Dry Kibble
- Shade the bottom half of each piece darker than the top.
- Add a small shadow beneath each kibble to show it’s resting on a surface.
- Use cross-hatching for extra depth in clusters.
Shading Wet Food
- Create a gradient from dark at the edges to light in the center.
- Add a bright highlight—use an eraser to lift graphite or a white pencil for contrast.
- For gravy, shade the liquid slightly darker around the chunks.
Shading Treats
- Use light, even shading—treats are usually pale and don’t have strong contrasts.
- Add a soft shadow underneath each piece.
- Highlight the top edges to show they’re dry and slightly reflective.
Step 5: Add a Bowl or Background (Optional but Effective)
Drawing just the food is great, but adding a bowl or setting makes your artwork more complete and realistic.
Drawing a Simple Bowl
- Sketch a wide, shallow circle for the rim.
- Draw a curved line underneath for the base.
- Add a shadow inside the bowl to show depth.
- Include a small spoon or label for extra detail.
Choosing a Background
- Minimalist: A plain white or colored background keeps focus on the food.
- Lifestyle: Add a kitchen counter, tile floor, or cat paw in the corner.
- Abstract: Use soft gradients or patterns for a modern look.
Pro Tip: In 2026, many artists use AI background generators to quickly create realistic settings. Try tools like Adobe Firefly or Canva’s AI art features to enhance your scene.
Step 6: Add Color (Optional)
Color brings your drawing to life. Here’s how to choose the right hues.
Color Palette for Cat Food
- Dry kibble: Beige, light brown, tan, with hints of orange or green (for flavor varieties).
- Wet food: Dark brown, grayish-brown, or reddish tones for meat. Gravy is usually amber or golden.
- Treats: Light brown, cream, or pale yellow.
Coloring Techniques
- Traditional: Use colored pencils or watercolor. Layer lightly and build up color gradually.
- Digital: Use layer blending modes like “Multiply” for shadows and “Overlay” for highlights.
- AI-assisted coloring: Some apps can auto-color your sketch based on reference images—great for beginners.
Step 7: Final Touches and Refinements
Before you call your drawing finished, take time to polish it.
Review Your Work
- Step back and look at the overall composition.
- Are the proportions correct? Is the lighting consistent?
- Do the textures look realistic?
Enhance Details
- Darken key shadows for contrast.
- Add tiny reflections or specks for realism.
- Clean up stray lines with an eraser.
Sign Your Art
Don’t forget to add your signature or digital watermark—especially if you plan to share it online.
Troubleshooting Common Mistakes
Even experienced artists make errors. Here’s how to fix them.
Problem: Kibble Looks Too Uniform
Solution: Vary the sizes, shapes, and shading of each piece. Real kibble isn’t perfect—embrace the imperfections.
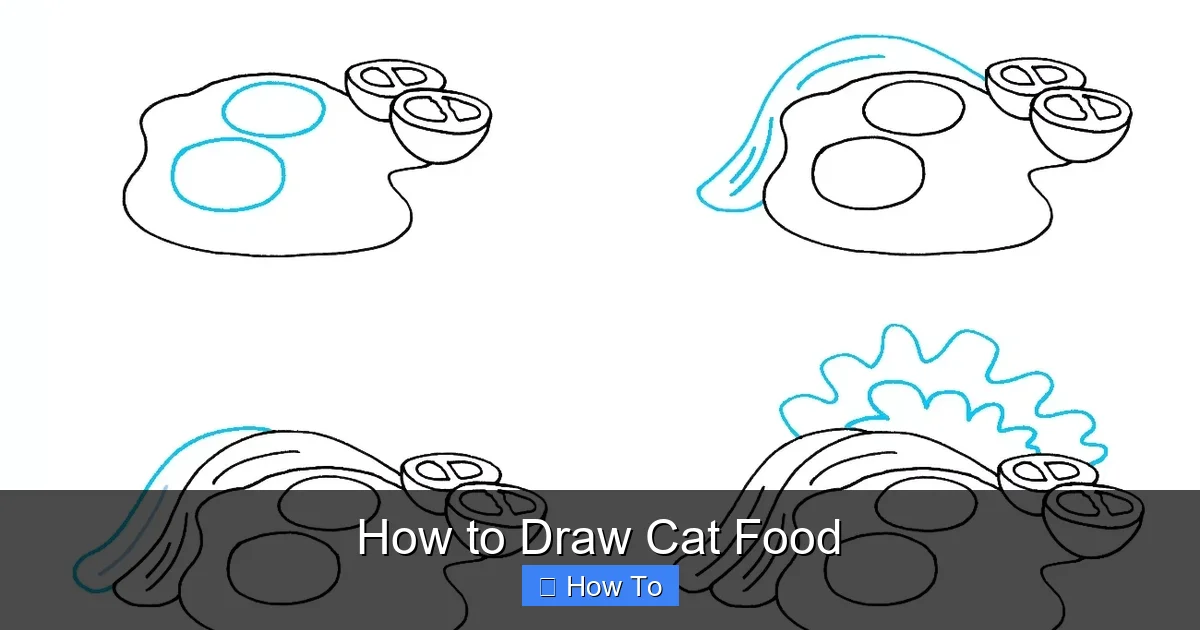
Visual guide about How to Draw Cat Food
Image source: howtodraweasy.net
Problem: Wet Food Looks Flat
Solution: Add more highlights and smooth gradients. Use a blending tool to soften edges and create a glossy finish.
Problem: Shadows Are Too Harsh
Solution: Use a kneaded eraser to lift excess graphite or lower the opacity of digital shadows. Soft lighting creates softer shadows.
Problem: Colors Look Washed Out
Solution: Layer colors more densely. In digital art, increase saturation slightly or use a vibrance adjustment layer.
Problem: The Bowl Looks Unnatural
Solution: Study real cat bowls. Notice how the rim curves and how light reflects off ceramic or plastic. Add a subtle highlight along the edge.
Creative Variations and Styles
Once you’ve mastered the basics, experiment with different artistic styles.
Cartoon Style
- Exaggerate shapes—make kibble huge or treats comically small.
- Use bright, bold colors.
- Add cute faces or expressions to the food pieces.
Realistic Style
- Focus on precise shading and texture.
- Use reference photos for accuracy.
- Include fine details like crumbs or moisture droplets.
Abstract or Surreal Style
- Distort proportions or colors.
- Draw cat food floating in space or growing like plants.
- Use mixed media—collage, ink, or digital effects.
Conclusion: Keep Practicing and Have Fun!
Learning how to draw cat food might seem silly at first, but it’s a fantastic way to improve your observation skills, texture rendering, and creativity. In 2026, with advanced tools and online communities, artists of all levels can share their work and learn from others.
Remember, every expert was once a beginner. Don’t worry if your first few attempts don’t look perfect. The key is to keep practicing, experimenting, and enjoying the process. Whether you’re drawing for fun, for pets, or for professional projects, your unique style will shine through.
So grab your pencil or tablet, find a bowl of cat food (or a photo), and start sketching. Who knows? Your next masterpiece might just be a delicious-looking dish of kibble.